
Set up USB Sharing in four parts
Turn it on where the iPhone is plugged in, add the phone on the Mac with Xcode, then start the bridge.
Updated
Set it up in four parts.
16 steps in four parts. After that, the Mac with the cable keeps sharing (it turns USB Sharing back on when Nuticast starts) and you only switch the bridge on and off.
Before you start
- Two Macs with Nuticast. The Mac with the cable needs no license; the Mac with Xcode needs one to bridge.
- A USB cable that carries data. Charge-only cables don’t work.
- Developer Mode on the iPhone: Settings → Privacy & Security → Developer Mode.
- The two Macs can reach each other: on the same mesh VPN (Tailscale, ZeroTier or Netbird) or the same local network.
Part 1: Turn on USB Sharing
On the Mac with the cable
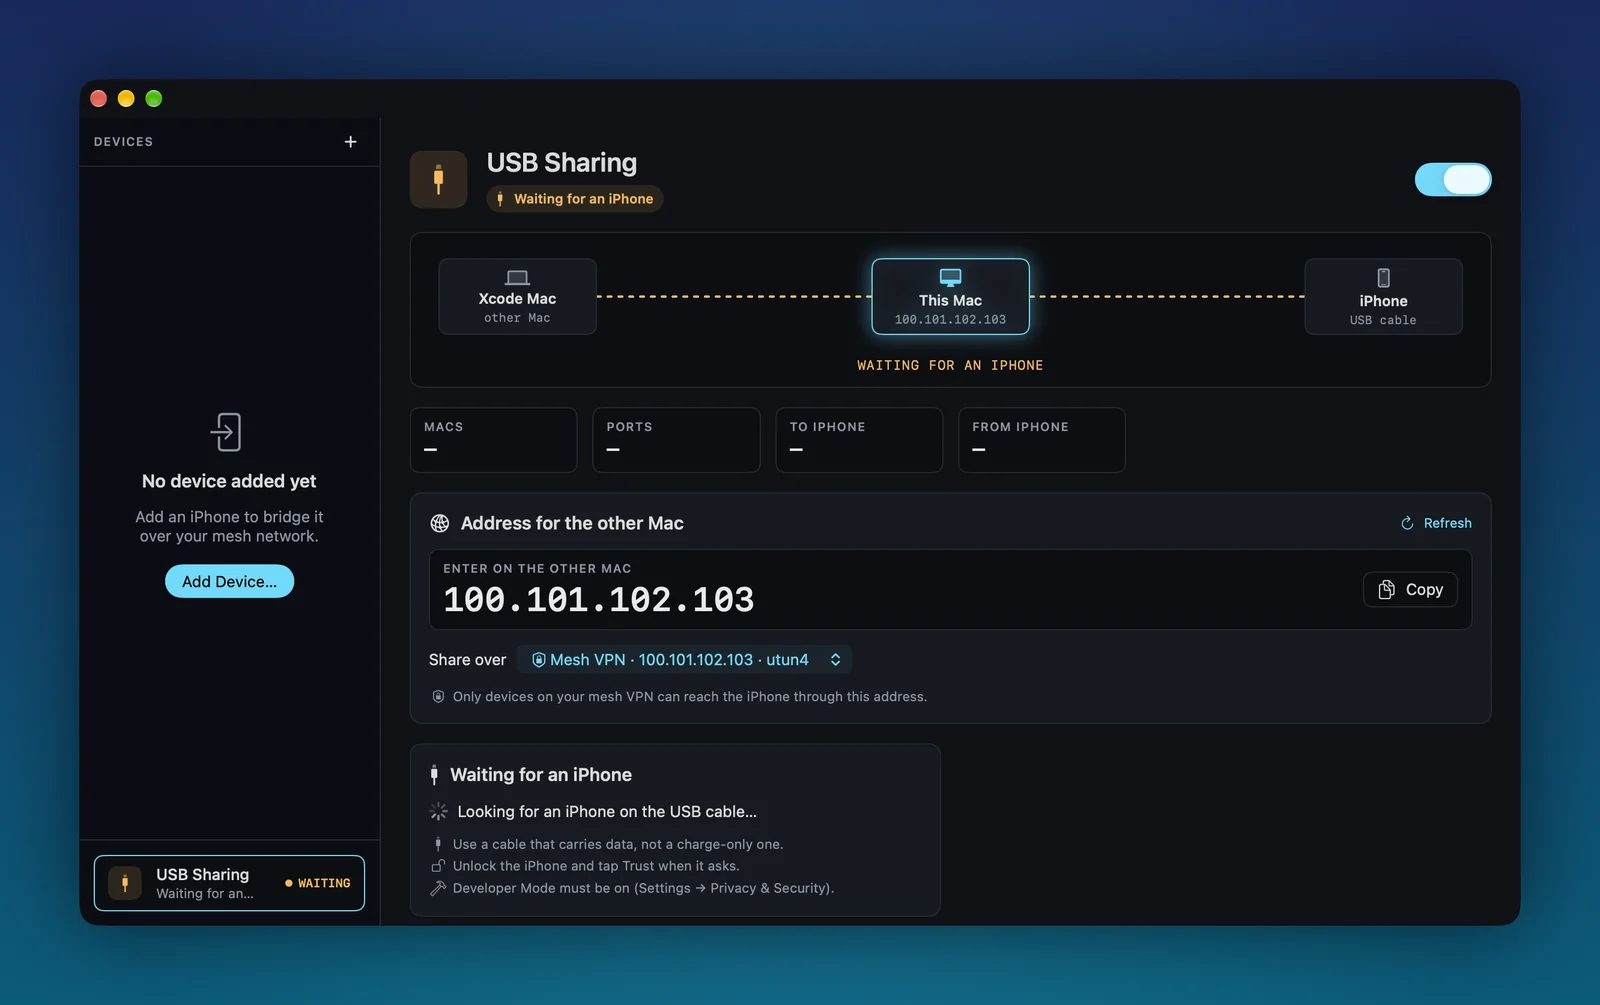
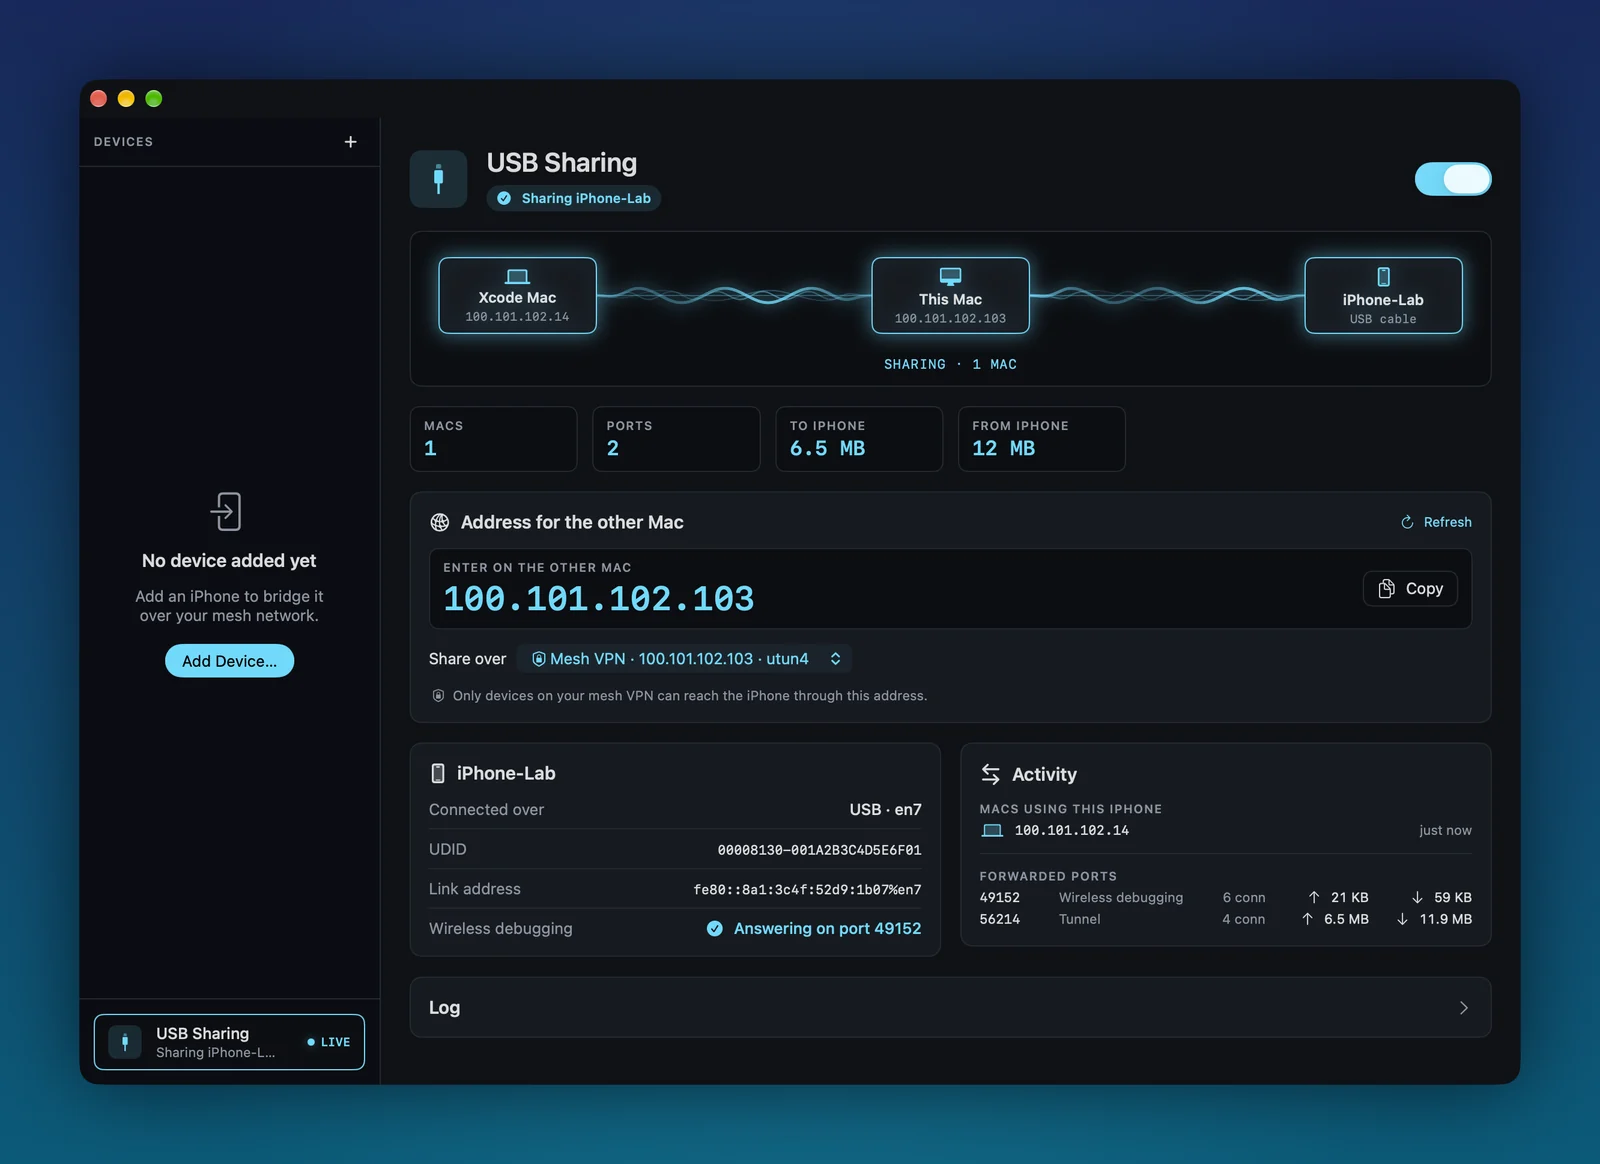
- Open Nuticast and click USB Sharing in the sidebar.
- Turn on the switch at the top right. The badge says Waiting for an iPhone until a phone is plugged in. That’s fine for now.
- Under Address for the other Mac, check the address in Share over. A Mesh VPN address is the default. A Local network address works too, but anyone on that network can then reach the iPhone’s debugging port.
- Click Copy next to the large address, the one labelled Enter on the other Mac.
Part 2: Add the iPhone with the USB via computer route
On the Mac with Xcode, with the iPhone next to it
- Pair the iPhone with Xcode if you haven’t yet. On iOS 27 or later: Xcode → Device Hub → + → Pair Nearby Device…, with both on the same Wi‑Fi. On older iOS, plug it in once, unlock it and tap Trust.
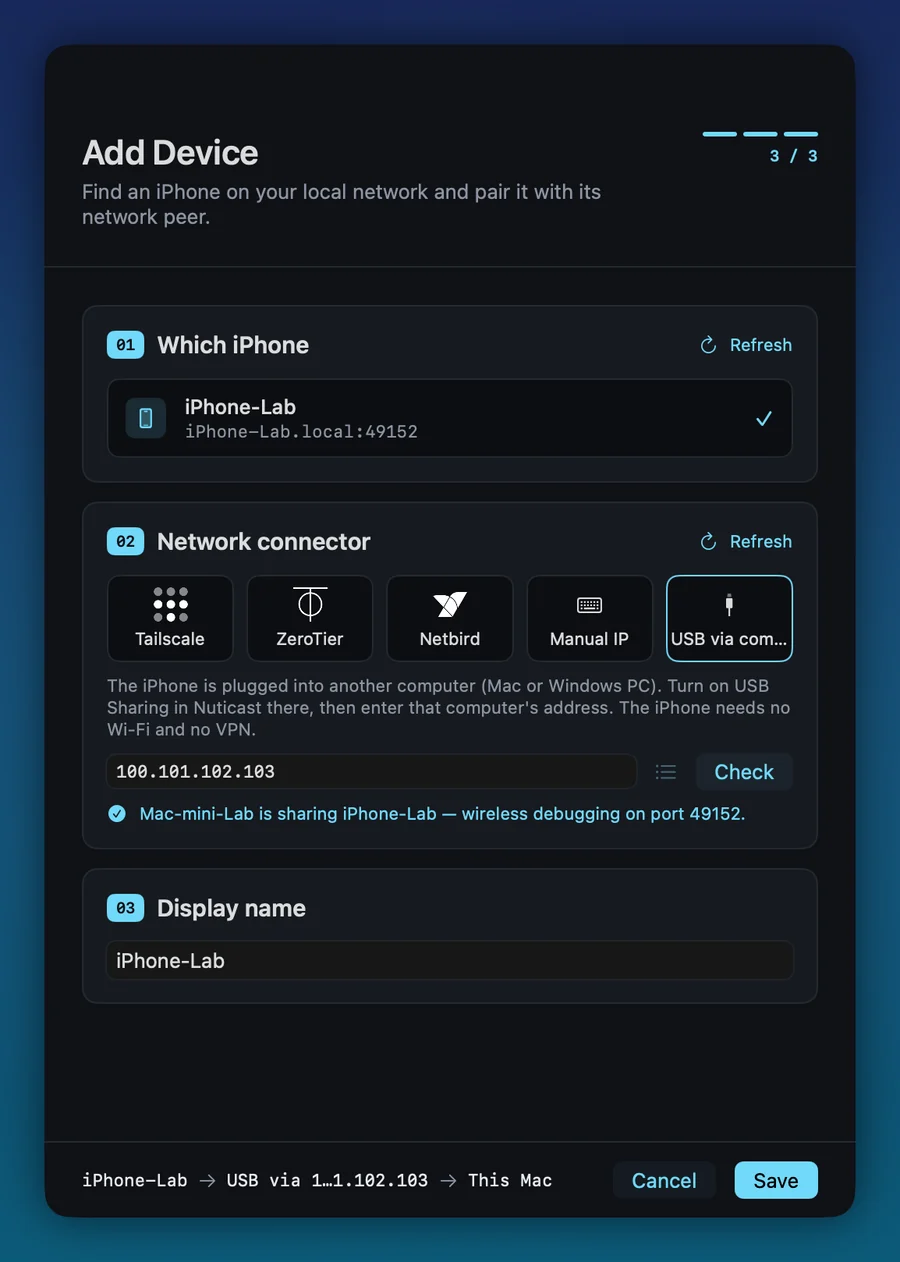
- In Nuticast, click Add Device…. Under 01 Which iPhone, pick the iPhone. A phone you added before is listed with a Saved badge even when it’s somewhere else.
- Under 02 Network connector, pick USB via computer and paste the address into Address of that computer. The list button next to it fills in a Mac from your mesh VPN.
- Click Check. It answers “… is sharing, but no iPhone is plugged in yet. You can still save this.” Once the phone is plugged in there, it names the phone and its port.
- Under 03 Display name, give it a name, then click Save. The device gets a small cable mark in the sidebar.
Part 3: Plug the iPhone in
On the Mac with the cable
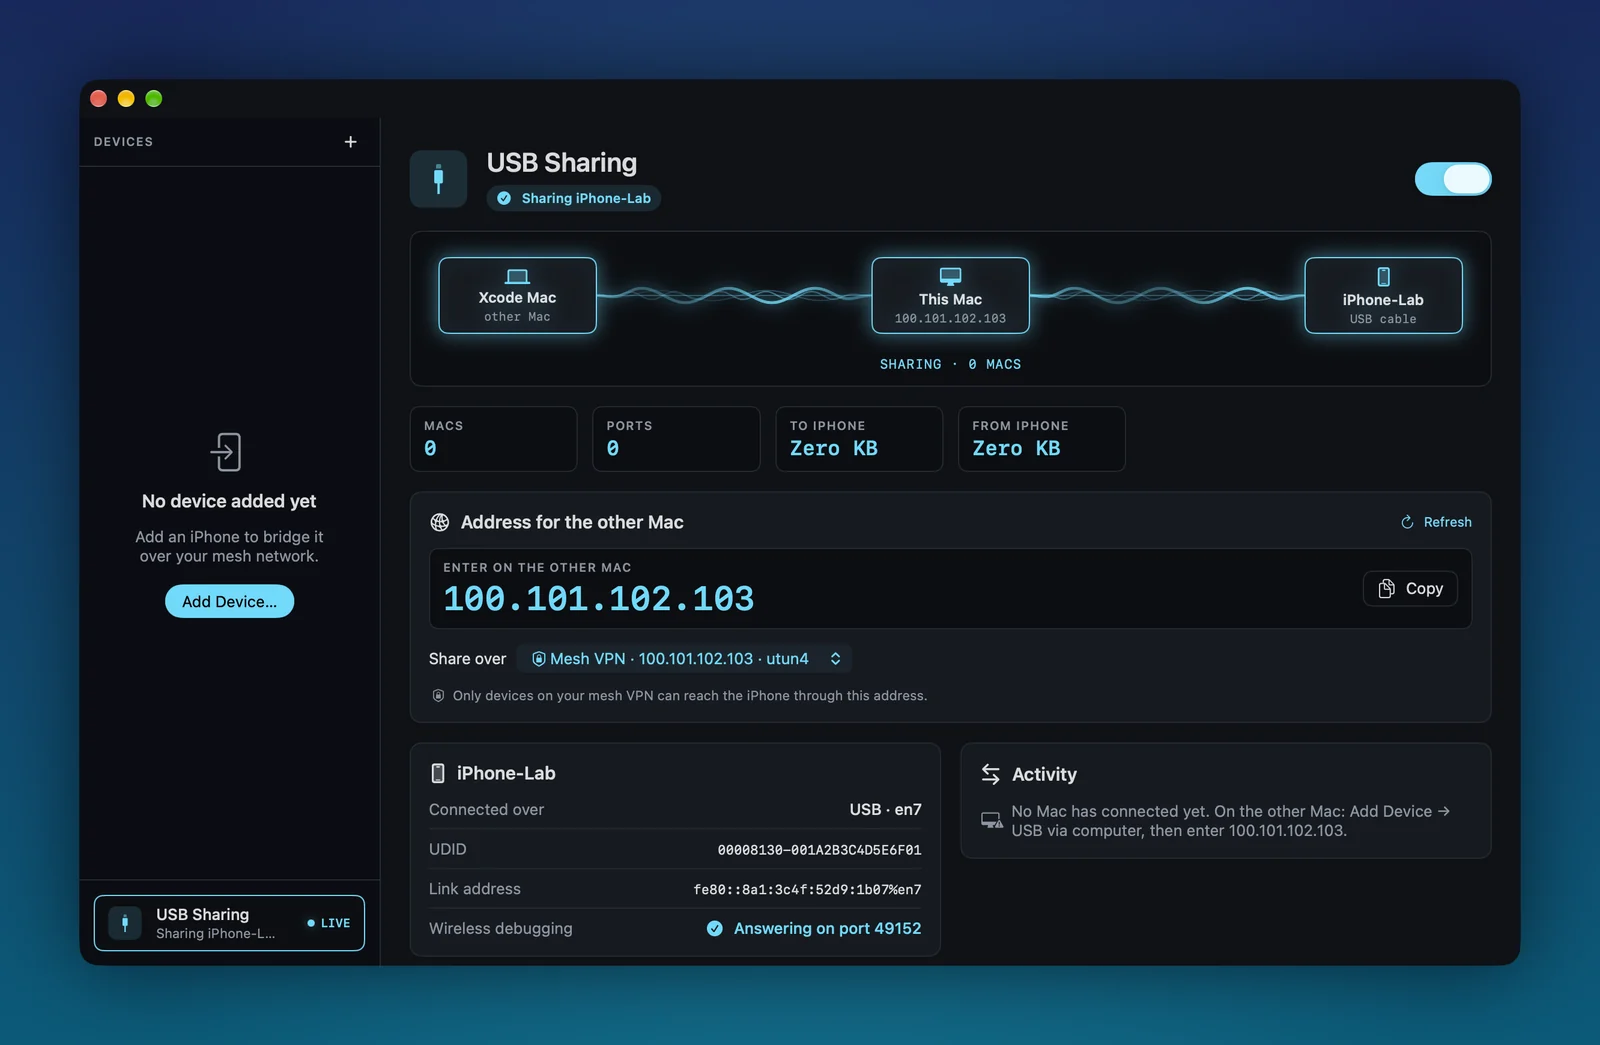
- Plug the iPhone in with the data cable and unlock it.
- Tap Trust if the iPhone asks, and enter its passcode.
- Wait until the row Wireless debugging shows Answering on port … in green. The badge then reads Sharing and the phone’s name.
Part 4: Start the bridge and run from Xcode
On the Mac with Xcode
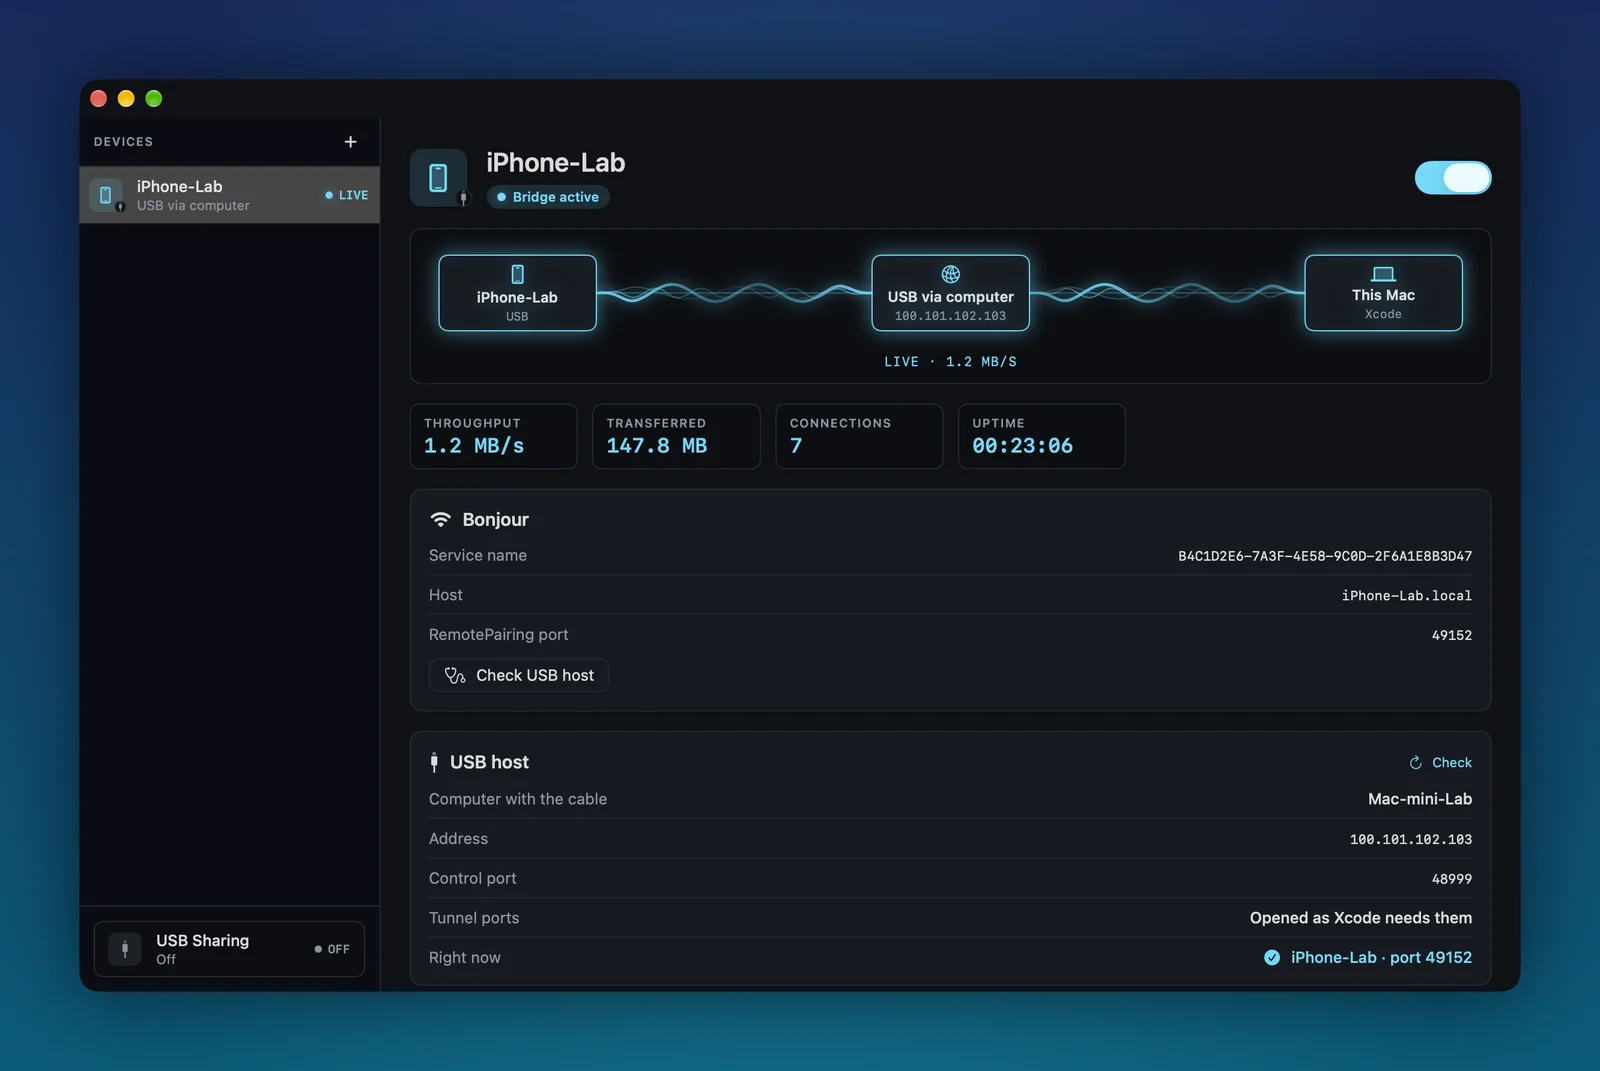
- Select the device in the sidebar. The USB host card shows the Computer with the cable, and Right now should name the iPhone and its port.
- Switch on Start Bridge (also in the menu bar). The status goes from Pairing… to Bridge active.
- In Xcode, pick the iPhone as the run destination and press Run. Breakpoints, LLDB and the console work as usual.
- On the Mac with the cable, Activity now lists your Mac under Macs using this iPhone, with the ports it forwards.
Stop sharing
Switch Start Bridge off on the Mac with Xcode. On the Mac with the cable, turn the USB Sharing switch off, or unplug the phone.
From the terminal
Handy on a headless Mac mini. On the Mac with the cable, this runs until Ctrl-C and prints the address to use. Add --listen <address> to pick one:
nuticast shareOn the Mac with Xcode, with the iPhone next to it, save the USB route (100.101.102.103 is an example address), then start and stop the bridge:
nuticast add --device "iPhone-Lab" --usb 100.101.102.103
nuticast up iPhone-Lab --detach
nuticast status iPhone-Lab
nuticast down iPhone-LabDon’t run nuticast share while the app on the same Mac has USB Sharing on: both want the control port.
If it doesn’t connect
On the Mac with Xcode, select the device and click Check USB host to ask the other Mac what it sees. The messages you may get:
- Waiting for an iPhone (on the Mac with the cable)
- Use a data cable, not a charge-only one. Unlock the iPhone and tap Trust. Check that Developer Mode is on.
- Wireless debugging: Not answering
- The iPhone is plugged in but doesn’t answer yet. Unlock it, tap Trust if asked, and check Developer Mode. Click Refresh, or unplug and plug it back in.
- “Is USB Sharing on there, and can this Mac reach it?” after Check
- Turn on USB Sharing on the other Mac and copy its address again. Make sure both Macs are signed in to the same mesh VPN, and that a firewall on the Mac with the cable lets Nuticast accept incoming connections.
- “USB host … didn’t answer on port 48999.”
- Same as above: the bridge can’t reach the Mac with the cable. Open Nuticast there, turn USB Sharing on, and check that this Mac can reach that address.
- “USB host … is sharing, but no iPhone is connected to it.”
- Plug the iPhone into that Mac, unlock it and tap Trust.
- “USB host … is still looking for …’s wireless debugging port.”
- The phone was just plugged in or is locked. Unlock it and start the bridge again in a moment.
- “USB host … no longer has an iPhone connected.”
- The cable came out or the Mac with the cable restarted. Plug the iPhone back in and unlock it. The bridge recovers by itself when that Mac answers again.
- “The device is still on this Mac’s local network.”
- The iPhone is also on your Xcode Mac’s Wi‑Fi, so Xcode already reaches it directly and you don’t need the bridge. To use the cable route anyway, turn the iPhone’s Wi‑Fi off or join another network.
- nuticast share: “Couldn’t listen on …: Address already in use”
- Another nuticast share, or the app’s USB Sharing, is already running on that Mac. Use one of them.
Use a Windows PC as the computer with the cable.
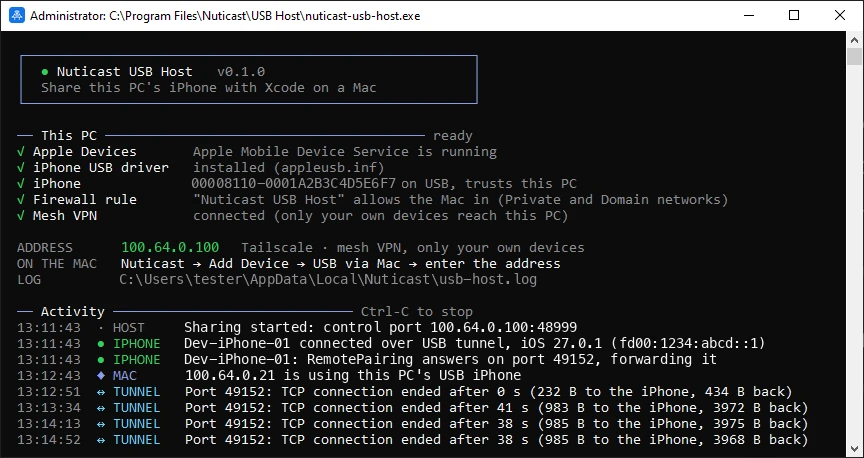
Nuticast USB Host is a small Windows program that does the same job as the Mac’s USB Sharing. It finds the iPhone on the cable and forwards it to your Xcode Mac. Nothing changes on the Xcode Mac: you add the phone with USB via computer and the PC’s address.
- How it works
- It reaches the iPhone through Apple’s own CoreDeviceProxy tunnel. That needs only Apple Devices from the Microsoft Store: no extra driver and no Personal Hotspot. The iPhone needs iOS 17.4 or later.
- The download is a setup wizard. It checks the PC for Apple Devices, installs the program with a Start menu shortcut and adds its Windows Firewall rule. The program itself runs in a console window and shows the address to type on the Xcode Mac.
- It runs on 64-bit Windows 10 or later.
- Windows can only be the computer with the cable. Xcode doesn’t run there, so the Xcode computer is always a Mac. Linux isn’t supported.
What it needs
- Apple Devices from the Microsoft Store on the PC.
- The iPhone unlocked, trusted, with Developer Mode on, as for a Mac host.
- The PC reachable from the Xcode Mac, ideally over a mesh VPN, with Windows Firewall allowing the program.
- The iPhone paired once with the Xcode Mac, as for any Nuticast device.
Questions, or a setup that doesn’t work? Write to hello@nuticast.com.